Note 01.08.2021: There is a new blog post that could be interesting after reading this post. It's about how to connect Svelte to the database. Using Hasura with Docker and a PostgreSQL database
In this blog post, you'll learn how to set up an app from scratch that is running in a Docker container and also why & when is using Docker interesting for you.
Why and when to use Docker?
If you're doing the first steps with Svelte you probably won't need Docker but if you're creating an app with a database and backend it will help to manage everything.
You could say: "Hey, I don't need Docker because I don't care about the initial setup for new developers". That's OK but if you're working in a team and you'd like to have the onboarding as easy as possible then using Docker is a good idea.
In my opinion, it is also a good idea for solo developers like me because you only have to run one command to have everything ready for development. So no need to start the backend server in one terminal and the frontend build in another one or even checking that the DB daemon is running.
Let me give you an example to add more background:
You're working on Windows and you'd like to use a Postgres database you'd go to the postgres download page and download the installer.
Next, you'd install and configure Postgres on your machine. Maybe you need to start the daemon and check that the DB server is accessible. After the DB is set up you're running your DB migrations to have the database ready for your app.
You see there are some steps that you'd have to explain for new devs that are joining your team. Maybe a team member would like to work on Linux or macOS and creating documentation for every OS is even more cumbersome.
Docker to the rescue
With Docker, you have to create the setup up once (which is a bit more work) but that will save you time later.
If everything is configured you'll just have to run docker-compose up with your configuration and Docker will install and arrange everything for you e.g. database setup, building & running frontend, backend, etc.
Before we start
The title mentions a Svelte app but the setup will also work with small modifications for other frontend apps e.g. projects created with Create-React-App or Vue-CLI to mention two.
At the moment, I'm learning Svelte and I'm a big fan because there is less boilerplate to create compared to React. You can see what I mean in the blog post Should you switch from React to Svelte?
If you'd like to checkout Svelte, please have a look at the Svelte Tutorial. I can highly recommend that tutorial as it is bite-sized with code exercises to test the concepts after learning them.
If you don't have the Docker sidebar in VS Code please have a look at VS Code Docker Extension docs.
Project setup
Create a new folder my_docker_app and inside that folder, you're creating a subdirectory "app".
This folder will contain the Svelte frontend app.
Next, change into the app directory and run the following commands
npm init svelte@next
npm install
npm run dev -- --open
Note: Answer the questions of the SvelteKit setup wizard as you like. I'm doing
- TypeScript in component? y
- CSS
- Add ESLint? y
- Add Prettier? y
You should now see an example Svelte app in your browser and you can start with your frontend development without Docker.
Now the base setup is ready and we can add Docker to our project.
Docker setup
In the my_docker_app/app folder create a file named Dockerfile with the following content - after the snippet, each line will be explained:
FROM mhart/alpine-node:12

# install dependencies
WORKDIR /app
COPY package.json package-lock.json ./
RUN npm ci

# Copy all local files into the image.
COPY . .

RUN npm run build

###
# Only copy over the Node pieces we need
# ~> Saves 35MB
###
FROM mhart/alpine-node:slim-12

WORKDIR /app
COPY --from=0 /app .
COPY . .

EXPOSE 3000
CMD ["node", "./build"]
That's a similar configuration as in the Svelte documentation site. See source code here.
Let me explain each row of the Dockerfile:
FROM mhart/alpine-node:12 set the base image that we'd like to use. The 12 means we're using Node.js version 12. For more details please have a look at the readme of alpine-node.WORKDIR /app sets the working directory in the image to app- Next line
COPY copies package.json and package-lock.json into the working directory
RUN npm ci is similar to npm install but used for CI runs (more details see here) - Note We're running with-out --production because we need devDependencies for building.COPY . . copies everything of our project into the working directory.RUN npm run build runs the SvelteKit build script. It builds our app so we can start it later.FROM mhart/alpine-node:slim-12 is creating a new stage in the image. Think of it like create a new image with the slim image. (If you don't care about the image size you could also omit the steps between EXPOSE & RUN npm run build.)WORKDIR /app same as beforeCOPY --from=0 /app . copy everything from stage 0 to the current working directoryCOPY . . copy everything from the project folder where the Dockerfile is located into the working directoryEXPOSE 3000 expose port 3000 so it's accessible from outside of the Docker container- Finally,
CMD ["node", "./build"] start the Svelte build result.
As the last step, add a .dockerignore file with the following content (to ignore node_modules and log files):
node_modules
npm-debug.log
Testing the Dockerfile
Before continuing - please check the installation guide for Docker (Windows) or MacOS Docker install
Once you've installed Docker on your machine you can build the image in VS Code by right-clicking the Dockerfile and select Build image.... (if asked for version just hit enter to use :latest tag) - if you don't have that in the context menu (please have a look VS Code Docker Extension docs)
 Screenshot build context menu (VS code)
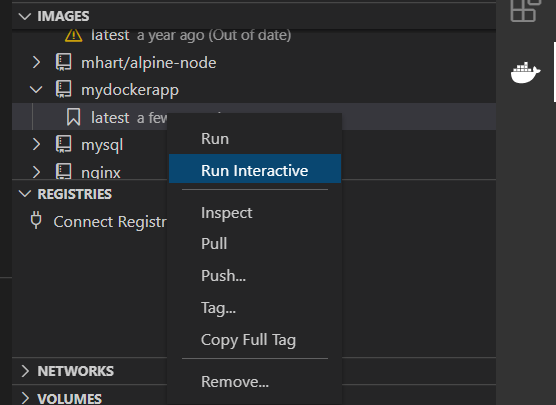
After the build is finished, click on the Docker icon in the sidebar of VS code and select the image that you have created - the exact version tag should be selected. Use right-click Run interactive to get more logs if there is an issue with your Dockerfile. (Normal run could be used too but I've noticed that there are not all log messages available and it's harder to debug the Docker configuration.)
 Screenshot Run Interactive
If you're getting a message port is already allocated. Open the Containers tab in the Docker sidebar in VS code and check if there is a container using the same port and stop the container - it's usually the container we're about to start.
The image should be in "individual containers" and you can see if it's running by a green play icon. Right-click and select stop to stop the container.
If your container is properly running you can check your app in a web browser at localhost:3000 and you should get a page looking like in the following screenshot:
 Screenshot Svelte "Hello world" app
Docker compose setup
Next, we're adding a Docker compose set up so we can configure more services.
I'll add a database service to add another service to the setup. I don't write how to use it here but I'm planning another post that is using this setup as a base.
Why do I need Docker-compose?
In short: If you're having more than one container you should use Docker compose to start and configure them.
So Docker is managing it for you as your services are related and they will be started by Docker compose and you don't have to start them manually.
For more details, please have a look in the Docker compose docs.
So let us start with the compose setup. In the root directory of your project add a file called docker-compose.yml with the content:
version: '3.9'

services:
    web:
        build: ./app
        ports:
            - "80:3000"
    db:
        image: postgres
        restart: always
        ports:
            - "5432:5432"
        environment:
            POSTGRES_PASSWORD: $POSTGRES_PASSWORD
    adminer:
        image: adminer
        restart: always
        ports:
            - 8080:8080
It's a yaml file and contains key/value pairs that Docker-Compose knows how to use them. A brief explanation of the configuration:
version: It's optional but it tells Docker-compose which specification is used for this configuration file (it's recommended to use the latest version - 3.9 is the version mentioned in the docs at the moment)services: In this array, you're defining the services that are available in your project. You can choose the naming of the services here I've picked web for the frontend and db for the database service.
build vs. image: build is using the Dockerfile in app folder and image is using postgres image from Docker-Hub as the base.ports: Is the port mapping first value before the colon is the port where the host can access the service and after the colon is the actual port inside the container - here port 3000 will be mapped to 80 (so access to the app will be http://localhost:80). It's an array because a container could expose multiple ports.environment: At the db service we're setting the Postgres password environment and we're using an env. variable (see below for details)
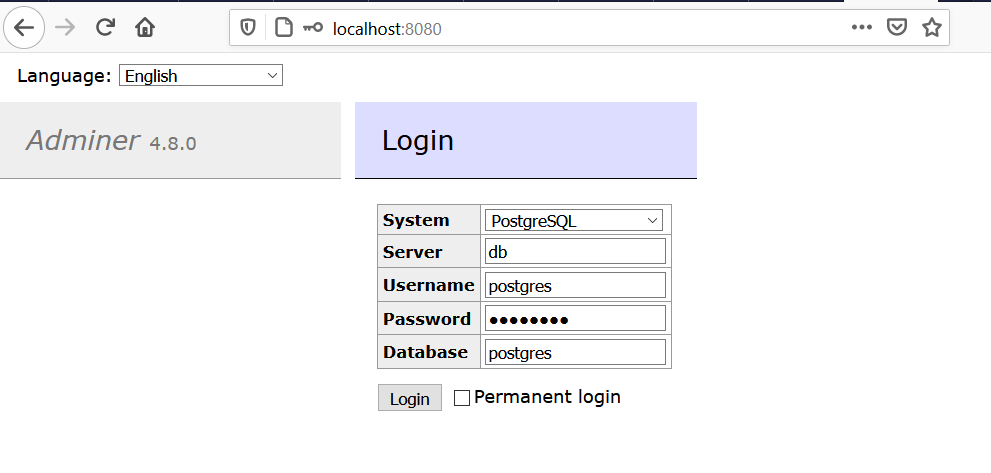
adminer service: This is a service for managing the database. You can access it with http://localhost:8080 - for server use the service name here db, the password added in the .env file & the default username. Note: The DB will be empty because we're not initializing it and we're also not using a volume to persist the data between start.
 Screenshot of Adminer login
Environment variables in docker-compose.yml
Place a .env file at the same location as the compose file. Docker will automatically use it for the variables in the docker-compose file.
Note: Don't version control the .env file. Use a version-tracked .env.example file without real passwords, so it's clear which key/values are required.
Example .env file:
POSTGRES_PASSWORD=secretPassword
Testing your docker-compose setup
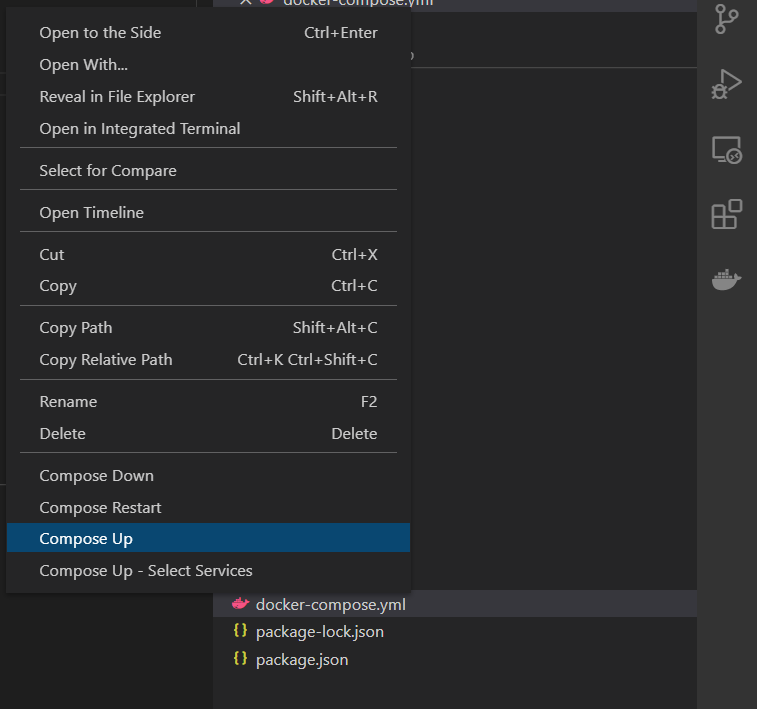
Right-click on the docker-compose.yml in VS code and click Compose Up if you're starting the first time or Compose Restart if you've changed your config and you want to apply your changes.
 Screenshot VS code - Compose Up
If everything is working as expected you should see done three times in the terminal.
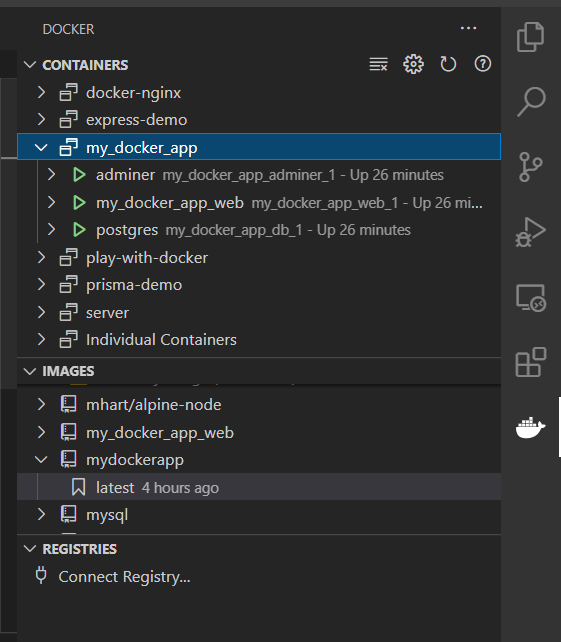
You can verify that all services are running by clicking the Docker sidebar in VS code and have a look at Containers\my_docker_app. You can inspect or start/stop each service there. Similar functionality like in the Docker dashboard on Windows.
The following screenshot shows our setup:
 Screenshot Docker compose (all services running)
Resources
Source Code
You can find the source code of the final example in the following Github repo AWolf81/my_docker_app.
Dockerfile notes
The above used Dockerfile is working as expected. But it could be improved to add some best practices.
Non-root user to run the server
It's recommended to use a non-root user if possible and restrict the capabilities to what's needed to run the processes.
What's next?
I haven't covered how to add a backend app that is using the database or how to deploy your container. I think I'll create a small demo app to show a complete app with Docker.
Also, the Dockerfile is creating a production build but how does the development process for the frontend work? I'd check if it's possible to use NODE_ENV to run the dev. server or production build. I think I have to check the deployment to see how to improve it.
If anything is not right in this post or if you need more details. Please add a comment below or send me a DM on Twitter @awolf81.